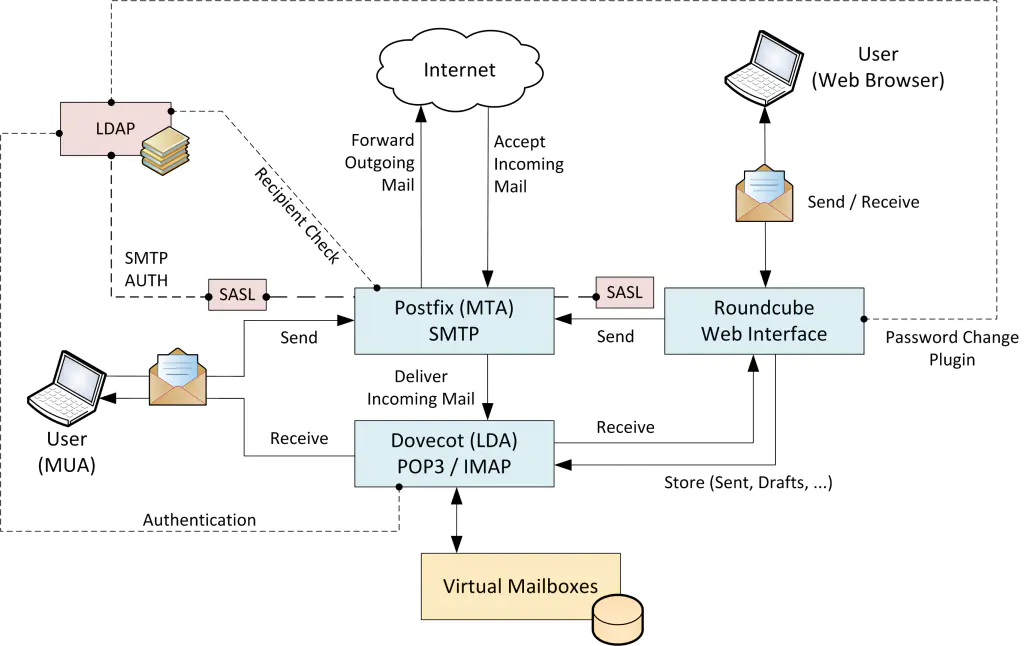
整体环境介绍
| 模块 | 作用 |
|---|---|
| postfix | 发邮件 |
| opendkim | 邮件加密 |
| dovecot | 收/存邮件,ldap用户认证(基于dovecot-ldap) |
| roundcube | web邮箱ui |
| php7.4 | roundcube运行环境 |
| mysql | web邮箱信息存储 |
| apache2 | web服务器 |
| OpenLdap | 用户目录 |
服务安装
dovecot
shell
yum install -y dovecotopendkim
shell
yum install -y opendkimpostfix
centos默认安装
shell
yum install -y postfix*php
shell
# 添加epel源
yum install -y epel-release
# 添加Remi的RPM存储库
rpm -ivh http://rpms.famillecollet.com/enterprise/remi-release-7.rpm
# 安装yum-config-manager工具
yum -y install yum-utils
# 卸载系统php
yum remove php*
# 查询pho
yum list install | grep php
# 选择roundcube官方支持版本
yum-config-manager --enable remi-php74
yum -y install php php-opcache php-pecl-apcu php-devel php-mbstring php-mcrypt php-mysqlnd php-phpunit-PHPUnit php-pecl-xdebug php-pecl-xhprof php-pdo php-pear php-fpm php-cli php-xml php-bcmath php-process php-gd php-common php-ldap php-pecl-imagick php-intl
# 扩展安装
pear channel-update pear.php.net
pear install Auth_SASL Net_SMTP Net_IDNA2-0.1.1 Mail_Mimeroundcube
shell
# 下载安装包
wget https://github.com/roundcube/roundcubemail/releases/download/1.5.2/roundcubemail-1.5.2-complete.tar.gz
# 解压及权限
tar -zxvf roundcubemail-1.5.2-complete.tar.gz
mv roundcubemail-1.5.2/* /var/www/html/
chown apache:apache -R /var/www/html/
chmod -R 775 /var/www/html
# 删除apache默认配置
rm -rf /etc/httpd/conf.d/welcome.conf
# 重启httpd服务
systemctl restart httpdmysql
shell
yum install -yum mysql57-community-release-el7-10.noarch.rpm
systemctl start mysqld
systemctl enable mysqldapache2
centos默认安装
OpenLdap
服务配置
端口开放
shell
# smtp
firewall-cmd --add-port=25/tcp --permanent
# pop
firewall-cmd --add-port=110/tcp --permanent
# imap
firewall-cmd --add-port=143/tcp --permanent
# mysql
firewall-cmd --add-port=3306/tcp --permanent
# roundcube
firewall-cmd --add-port=80/tcp --permanent虚拟用户配置
shell
# group添加 固定group id
groupadd --gid 5000 vmail
# 用户添加 固定用户id及home目录
useradd -s /sbin/nologin --group vmail --gid 5000 --uid 5000 --home-dir /usr/local/vmail vmail
# 设置home目录权限
chmod 700 /usr/local/vmailLDAP
dovecot配置
- dovecot.confproperties
# vim /etc/dovecot/dovecot.conf protocols = imap pop3 lmtp listen = * login_trusted_networks = 0.0.0.0/0 auth_username_format = %n !include conf.d/*.conf !include_try local.conf - dovecot-ldap.conf.extproperties
# vim /etc/dovecot/dovecot-ldap.conf.ext # ldap认证配置 hosts = localhost dn = cn=admin,dc=abc,dc=com dnpass = password ldap_version = 3 base = ou=user,dc=abc,dc=com scope = subtree # 用户过滤 user_filter = (&(objectClass=inetOrgPerson)(cn=%u)) # 传递参数 ldap属性=dovecot参数 pass_attrs = cn=user,userPassword=password pass_filter = (&(objectClass=inetOrgPerson)(cn=%u)) # 密码加密方式 clear明文 default_pass_scheme = clear - 根据情况关闭sslproperties
# vim /etc/dovecot/conf.d/10-ssl.conf ssl = no - 10-auth.confproperties
# vim /etc/dovecot/conf.d/10-auth.conf disable_plaintext_auth = no auth_mechanisms = plain login # 使用ldap认证注释掉本地认证 不然会导致邮件查询很慢 #!include auth-system.conf.ext # 新增行 !include auth-ldap.conf.ext - 10-mail.confproperties
# vim /etc/dovecot/conf.d/10-mail.conf # 每个邮件用户的存储目录 %u是用户名 mail_location = maildir:/usr/local/vmail/%u/Maildir namespace inbox { inbox = yes } # 虚拟用户、组id mail_uid = 5000 mail_gid = 5000 - 10-master.confshell
service imap-login { inet_listener imap { #port = 143 } inet_listener imaps { #port = 993 #ssl = yes } } service pop3-login { inet_listener pop3 { #port = 110 } inet_listener pop3s { #port = 995 #ssl = yes } } service lmtp { unix_listener lmtp { #mode = 0666 } } service imap { } service auth { unix_listener auth-userdb { mode = 0777 } # Postfix smtp-auth unix_listener /var/spool/postfix/private/auth { mode = 0666 user = postfix group = postfix } } service auth-worker { #user = root } service dict { unix_listener dict { #mode = 0600 #user = #group = } } - auth-ldap.conf.extshell
# vim /etc/dovecot/conf.d/auth-ldap.conf.ext passdb { driver = ldap # Path for LDAP configuration file, see example-config/dovecot-ldap.conf.ext args = /etc/dovecot/dovecot-ldap.conf.ext } userdb { driver = ldap args = /etc/dovecot/dovecot-ldap.conf.ext } - 20-imap.confshell
# vim /etc/dovecot/conf.d/20-imap.conf protocol imap { # Space separated list of plugins to load (default is global mail_plugins). mail_plugins = $mail_plugins autocreate } plugin { autocreate = Trash autocreate2 = Junk autocreate3 = Drafts autocreate4 = Sent autosubscribe = Trash autosubscribe2 = Junk autosubscribe3 = Drafts autosubscribe4 = Sent } - 重启dovecotshell
systemctl restart dovecot
opendkim签名配置
- opendkim.confshell
# vim /etc/opendkim.conf # 设置文件内容如下 UserID opendkim:opendkim UMask 022 Mode sv PidFile /var/run/opendkim/opendkim.pid Canonicalization relaxed/relaxed TemporaryDirectory /var/tmp ExternalIgnoreList refile:/etc/opendkim/TrustedHosts InternalHosts refile:/etc/opendkim/TrustedHosts KeyTable refile:/etc/opendkim/KeyTable SigningTable refile:/etc/opendkim/SigningTable MinimumKeyBits 1024 Socket inet:8891 LogWhy Yes Syslog Yes SyslogSuccess Yes - 创建、配置密钥shell
# 注意替换abc.com为你的域名 mkdir -p /etc/opendkim/keys/abc.com opendkim-genkey -D /etc/opendkim/keys/abc.com/ -d abc.com -s default # 得到如下两个文件 # ls /etc/opendkim/keys/abc.com/ # default.private default.txt # vim /etc/opendkim/KeyTable # 添加以下内容 default._domainkey.abc.com abc.com:default:/etc/opendkim/keys/abc.com/default.private # vim /etc/opendkim/SigningTable # 添加以下内容 *@abc.com default._domainkey.abc.com # vim /etc/opendkim/TrustedHosts # 设置信任签名 添加本地信任 127.0.0.1 # 文件授权 chown opendkim:opendkim -R /etc/opendkim/ chmod -R 700 /etc/opendkim # 密钥验证 opendkim-testkey -d abc.com -s default -vvv - 设置开启启动并启动服务shell
systemctl enable opendkim.service
systemctl start opendkim.service
postfix配置
- main.cfproperties
# vi /etc/postfix/main.cf # 复制备份main.cf # 对应值修改为自己的域名 myhostname = mail.abc.com # 对应值修改为自己的域名 mydomain = abc.com inet_interfaces = all # 支持ipv6就设置为all inet_protocols = ipv4 # 空值 mydestination = mynetworks_style = host mynetworks = all relay_domains = $mydestination home_mailbox = Maildir/ smtpd_banner = Welcome using Postfix Esmtp Service debug_peer_level = 1024 # 认证方式 smtpd_sasl_type = dovecot smtpd_sasl_path = private/auth smtpd_sasl_auth_enable = yes broken_sasl_auth_clients = yes smtpd_sasl_local_domain = $myhostname smtpd_sasl_security_options = noanonymous smtpd_recipient_restrictions = permit_mynetworks, permit_sasl_authenticated, reject_unauth_destination # 邮件信息大小限制 结合附件大小限制设置 附件转码后后比原始文件大1/3左右 message_size_limit = 157286400 # 用户空间大小限制 0不限制 根据情况设置 mailbox_size_limit = 0 # 虚拟用户配置 virtual_transport = dovecot dovecot_destination_recipient_limit = 1 virtual_mailbox_domains = $mydomain # 虚拟邮箱根目录 virtual_mailbox_base = /usr/local/vmail # ldap认证配置 virtual_alias_maps = proxy:ldap:/etc/postfix/ldap_virtual_aliases.cf # 虚拟用户组及用户id virtual_uid_maps = static:5000 virtual_gid_maps = static:5000 # 用户空间大小限制 0不限制 根据情况设置 virtual_mailbox_limit = 0 # DKIM 邮件验证配置 milter_default_action = accept milter_protocol = 2 smtpd_milters = inet:8891 non_smtpd_milters = inet:8891 - master.cfshell
# vi /etc/postfix/master.cf # 在文件末尾添加 dovecot unix - n n - - pipe flags=ODRhu user=vmail:vmail argv=/usr/libexec/dovecot/deliver -e -f ${sender} -d ${recipient} - ldap_virtual_aliases.cfproperties
# vim /etc/postfix/ldap_virtual_aliases.cf version = 3 bind = yes # ldap验证dn bind_dn = cn=admin,dc=abc,dc=com bind_pw = password server_host = localhost # 用户查询base dn search_base = ou=user,dc=abc,dc=com # 按照用户名查询用户邮箱 query_filter = (&(objectClass=inetOrgPerson)(cn=%u)) # 返回属性 result_attribute = mail result_format = %s - 重启postfixshell
systemctl restart postfix
roundcube配置
- 数据库配置
sql
USE mysql;
CREATE USER 'roundcube'@'localhost' IDENTIFIED BY 'mypassword';
GRANT USAGE ON * . * TO 'roundcube'@'localhost' IDENTIFIED BY 'mypassword';
CREATE DATABASE IF NOT EXISTS `roundcube`;
GRANT ALL PRIVILEGES ON `roundcube` . * TO 'roundcube'@'localhost';
FLUSH PRIVILEGES;php配置
properties# 时区 date.timezone = Asia/Shanghai # 已安装MySQL对应的sock文件 pdo_mysql.default_socket=/data/mysql/tmp/mysql.asock # post限制 post_max_size = 1024M # 文件上传限制 upload_max_filesize = 100M max_execution_time = 1200 max_input_time = 1200 memory_limit = 1024M # 根据文件上传大小调整socket连接超时时间 单位秒 default_socket_timeout=300roundcube初始化 访问http://host/installer/index.php配置 初始化完成后,修改权限禁止初始化页面访问
 shell
shellchmod -R 600 /var/www/html/installer/config.inc.php
php<?php $config['db_dsnw'] = 'mysql://roundcubemail:roundcubemail@localhost/roundcubemail'; // 改为smtp和imap的局域网地址 有助于邮件发送速度 $config['default_host'] = 'localhost'; $config['smtp_server'] = 'localhost'; $config['smtp_port'] = 25; $config['support_url'] = ''; $config['des_key'] = 'des_key'; // 修改为你的邮件域名 $config['username_domain'] = 'abc.com'; // 登录界面展示邮箱名称 $config['product_name'] = 'xxx公司web邮箱'; $config['plugins'] = []; $config['language'] = 'zh_CN'; // 自动填充的通讯录 $config['autocomplete_addressbooks'] = ['sql', 'public']; // ldap通讯录配置 $config['ldap_public']['public'] = array( 'name' => '公司通讯录', 'hosts' => array('localhost'), 'port' => 389, 'base_dn' => 'ou=user,dc=abc,dc=com', 'user_specific' => true, 'bind_dn' => 'cn=admin,dc=abc,dc=com', 'bind_pass' => 'mima', 'search_fields' => ['mail', 'sn', 'cn'], 'filter' => '(objectClass=inetOrgPerson)', // ldap属性映射 'fieldmap' => array( 'name' => 'sn', 'email' => 'mail', 'surname' => 'cn', 'phone:work' => 'mobile' ) );重启httpd服务
shellsystemctl restart httpd